
How to Sew Pointe Shoes

Two of the things I love about acquiring a new pair of pointe shoes is the sewing of pointe shoes and breaking it in. I love how so much effort and love is being put in my most expensive pair of shoes ever.
When I acquired my first pair of pointe shoes, my mom did all the sewing. Actually, my mom also sew my 2nd pair of pointes. But now that I am old enough to know how to sew my own pointes, I decided to make this step by step guide on how to sew pointe shoes.

Materials:
-Your brand new pair of pointe shoes
-Elastic (The thickness depends on you. As for me, I like it thick, about an inch thick)
-Ribbons
-Needle and Thread
-Scissors
-Match or lighter
-Candle (not in photo. optional)

STEP 1. Cut your ribbons. Pointe shoe ribbon usually comes precut (about 2.5 meters long) and is free upon your purchase of pointe shoes so no need to worry about that. But if ever your shoes doesn't have free ribbons or the shop doesn't sell pointe shoe ribbons, you can buy at any craft store. This rarely happens though.
So anyway, cut the ribbon into half, then repeat until you have four ribbons of equal length.

STEP 2. Seal the ribbon end. It is important to seal the ends of the ribbons and stop them from fraying for if you don't, your ribbons will be gone by the time you did 3 dances or so (I am exaggerating but you get my point). To do this, light a candle or use a lighter. Take one end of the ribbon and bring it close to the edge of the flame. The heat will melt the satin. Be careful in doing this.
Now, time to sew!

STEP 3. If you're a first timer, the crucial part in sewing pointe shoes is locating where you'll place the ribbons. The trick is, fold the heel over until it's flat against the insole. Mark the spot next to the crease. The ribbon will fit between that and the stitching of the pointe shoes. Or to make these words more understandable, sew the ribbon at the end of the crease.
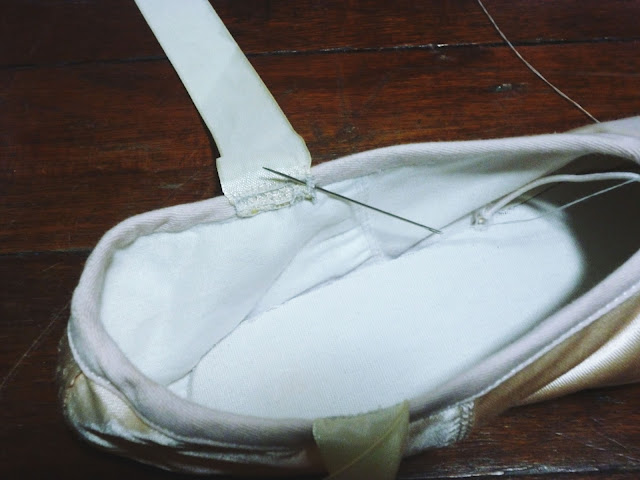
STEP 4. Sew the ribbon. I think it is preferable to have at least about a few centimeters dangling (not like what I did) for emergency cases.
One time, during a ballet recital / show, one of the ribbons of my pointe shoes was loosen up and my mom had to sew it a few minutes before I go on stage. That ribbon was shorten because it had to be cut as it became frayed. So I think having a little extra ribbon on your pointes will be good for emergency purposes. However though, this doesn't work for me as it is irritating for my feet. I feel uncomfortable so I want it to be exact, pictured above.
Sew along all sides of the ribbon. I use blanket stitch for mine. You can also double stitch it to make it stronger. Do this on all 4 ribbons, left and right shoes.


STEP 5. Sew the elastics. The elastics will keep the pointe shoe heel secured and they can also give a more form-fitting appearance.
If you bought bloch, it comes with a Bloch covert elastic (mesh type elastics). However, I don't like using this type of elastic as I am not comfortable with it. This brand of pointe shoes that I'm sewing for this post is a Philippine local brand called Yvonnes and it doesn't come with an elastic so I just used my spare. I bought mine from That's 'D Pointe, a local shop for ballerinas and dancers. But you can buy yours at any craft supplies store. The type of elastic that you have to use really depends on your preference (or your teacher's preference), but as for me, I like it thick and I prefer the single placement across the front of the ankle, from one side of the heel to the other. And this preference is what I will share.
How to sew the elastics on your pointe shoes?
You need about 25-28 cm elastic for one shoe. Place the elastic beside the ribbons (see photo above) and sew on the inside. After you have sewn the first side, wear your pointe shoes (don't tie the ribbons!) then stretch the elastics over your ankle until it feels right and until you find the right tension. Mark the elastics, remove the shoe, then sew one edge (bottom edge). Then fit again. If it feels just right, finish sewing the elastics.
Repeat the process on the other shoe.
Note: You can use blanket stitch in sewing your pointe shoes. And you can double stitch to make the ribbons and the elastics stronger.

STEP 6. Fit (wear) the shoes, tighten the drawstring by pulling it and then make a double-knot. Some dancers cut the excess drawstring but I don't cut mine because I just leave it as is. You will tuck the ends under anyway when you wear the shoes.


And that is how to sew pointe shoes. That's how I do mine and I hope this step by step guide has helped you.


6 comments
great tutorial...I found it very interesting. I doubt that at my age, I'll start dancing ballet, but you never know:)
ReplyDeletehttp://modaodaradosti.blogspot.com/
So pretty!
ReplyDeleteGreat post and amazing pictures :)...thx for sharing!
ReplyDeleteVery detailed tutorial Rae...I had no idea what a ballerina had to do to her shoes... I just learned something new xox ♡
ReplyDeleteNice blog! I'm so impressed with your blog because it was smart-authored and the layout was beautiful. Anyway, I found your blog consist of interesting topic. I want to try it to my old shoes at home. Thank you for sharing this with us.
ReplyDeleteIf you're interested to learn more about second hand shoes of Christian Muller Boex, you can visit this site: http://www.boex.tv/
This is something phenomenal tips about ballet dance. yes i agree that preparing of shoes had main and basic thing in the perform of dancing thanks so much to introduce this post.
ReplyDeleteBallet equipment |
Ballet Workout Dvd